Landscape art movements have shaped how we view and interpret the natural world for centuries. For collectors, decorators, and art enthusiasts, understanding these movements is essential for making informed decisions when selecting pieces for their spaces. This comprehensive evaluation explores how different landscape art movements function as a framework for appreciating and acquiring art, examining their distinctive features, strengths, limitations, and practical applications for modern buyers.
The study of landscape art movements serves as an invaluable tool for anyone looking to build a meaningful art collection. These movements provide context, historical significance, and aesthetic guidelines that help identify quality work and ensure your selections align with your personal taste and interior design goals. By evaluating movements chronologically from Romanticism through Contemporary styles, you can develop a sophisticated eye for landscape art that enhances both your appreciation and investment decisions.
Classical Foundations: Romanticism and Realism
The Romantic movement (1800-1850) revolutionized landscape art by prioritizing emotional response over accurate representation. Artists like J.M.W. Turner created dramatic scenes featuring turbulent skies, rugged mountains, and sublime natural phenomena. This movement excels at creating focal points in living spaces that evoke wonder and contemplation. However, Romantic landscapes can sometimes feel overly theatrical for minimalist or contemporary interiors.
Meanwhile, the Realist movement offered a counterpoint with its commitment to depicting nature truthfully. Artists meticulously rendered everyday rural scenes without embellishment or idealization. Realist landscapes work exceptionally well in traditional and transitional spaces, providing grounding visual elements that complement classic furniture. The primary limitation is that these pieces may lack the visual impact desired for statement walls or modern aesthetics. For those exploring global landscape art styles, these classical foundations remain essential reference points.
Evaluating Classical Movement Prints
When assessing landscape prints from these movements, consider the quality of reproduction and color fidelity. Original paintings from these periods are museum pieces, but high-quality giclée prints can capture the essence effectively. Look for prints that preserve the tonal range and atmospheric effects that define these styles, particularly the luminous quality in Romantic works or the precise detail in Realist pieces.
Revolutionary Movements: Impressionism to Modernism
Impressionism (1860-1890) transformed landscape art by capturing fleeting moments of light and atmosphere through loose brushwork and vibrant color. Artists like Claude Monet demonstrated how landscapes could convey sensory experience rather than precise documentation. This approach works beautifully in contemporary homes, adding energy and light to spaces without overwhelming them. The softer edges and pastel palettes integrate seamlessly with various color matching strategies for interior design.
Post-Impressionism and Expressionism pushed boundaries further, with artists like Vincent van Gogh using bold colors and dynamic brushstrokes to convey emotional intensity. These movements offer exceptional versatility for modern collectors seeking pieces with personality and visual impact. According to art historical research, these transitional movements bridge classical techniques with modern sensibilities, making them particularly valuable for eclectic interiors.
Modernist Innovation and Abstract Landscapes
The Modernist movement stripped landscapes to essential forms, colors, and geometries. Artists reduced natural scenes to abstract compositions that suggest rather than depict. These works excel in minimalist spaces and contemporary settings, providing sophisticated focal points without visual clutter. The main consideration is ensuring the abstraction level matches your comfort with non-representational art. For guidance on selecting such pieces, minimalist landscape art principles offer valuable insights.
Contemporary Applications and Recommendations
Contemporary landscape movements continue evolving, incorporating photography, digital media, and mixed techniques. These approaches offer fresh perspectives on natural subjects while honoring historical traditions. The diversity within contemporary landscape art means buyers can find pieces that resonate personally while fitting any interior design scheme. Moreover, contemporary works often address environmental themes, adding conceptual depth that enhances their long-term value.
For practical application, start by identifying which movement aesthetics align with your space and sensibilities. Consider these factors: the emotional tone you want to establish, your existing color palette, and the level of visual energy appropriate for each room. Testing different styles through quality art print selections allows experimentation before committing to larger investments. Additionally, understanding fundamental elements of landscape art helps evaluate quality across movements.
Strengths and Limitations Summary
Understanding landscape art movements offers numerous advantages for collectors. It provides a systematic framework for evaluation, helps predict how pieces will age aesthetically, and enables informed conversations with galleries and dealers. Furthermore, this knowledge prevents costly mistakes by clarifying which styles suit specific spaces and purposes. However, the limitation lies in potential over-reliance on categorization at the expense of personal response. The best acquisitions balance historical awareness with genuine emotional connection.
Final Recommendations
Consequently, approach landscape art movements as guides rather than rigid rules. Use this knowledge to refine your preferences and identify quality work, but allow personal taste to guide final selections. Visit galleries, study reproductions online, and consider how different movements make you feel. For displaying your selections effectively, professional hanging techniques maximize visual impact regardless of movement style.
Ultimately, the value of understanding landscape art movements extends beyond mere categorization. It enriches your appreciation, sharpens your aesthetic judgment, and ensures your collection develops coherently over time. Whether drawn to the drama of Romanticism, the light of Impressionism, or the abstraction of Modernism, this knowledge empowers confident, satisfying art acquisition decisions that enhance your living environment for years to come.
joerussell
Australian abstract artists based in Byron Bay and curator of the GumPrints art print collection.
Plant diversity represents one of Earth’s most valuable resources, yet its environmental impact often goes underappreciated in conversations about climate change and ecological health. From stabilizing our atmosphere to preventing soil erosion, the variety of plant species across our planet performs critical functions that sustain all life. Understanding how botanical diversity safeguards our world helps us recognize why preserving these ecosystems must remain a global priority.
The interconnected relationship between plant diversity and planetary health operates on multiple levels. When ecosystems maintain rich plant populations, they regulate carbon cycles, support wildlife populations, and maintain soil integrity. This comprehensive article explores seven essential ways that plant diversity saves our planet, demonstrating that biodiversity isn’t simply nice to have—it’s absolutely necessary for human survival and ecological stability.
1. Carbon Sequestration and Climate Regulation
Diverse plant ecosystems absorb significant quantities of carbon dioxide from the atmosphere. Tropical rainforests, wetlands, and grasslands containing hundreds of plant species work collectively to capture and store carbon in their tissues and soil. This process directly counteracts greenhouse gas accumulation responsible for global warming.
When plant diversity decreases, the overall carbon storage capacity of an ecosystem weakens considerably. Monoculture plantations—where only one species dominates—cannot sequester carbon as effectively as biodiverse forests. Furthermore, understanding plant evolution and adaptation reveals how different species evolved to fill specific ecological roles, including carbon capture mechanisms that complement one another.
2. Soil Health and Erosion Prevention
Plant variety maintains soil structure through diverse root systems that penetrate different soil depths. Some plants anchor topsoil while others break up compacted earth below. This complexity prevents erosion during heavy rains and windstorms that would otherwise strip away fertile layers.
Additionally, different plant species contribute varying types of organic matter when they decompose. This creates nutrient-rich soil capable of supporting future plant growth. When biodiversity declines, soil degradation accelerates, making land vulnerable to desertification and unsuitable for agriculture. The interconnected nature of plant family classification shows how different botanical groups contribute distinct benefits to soil ecosystems.
3. Water Cycle Stabilization
Diverse plant communities regulate water movement through ecosystems. Forests with varied vegetation slow water runoff, allowing soil to absorb moisture. This recharges groundwater supplies and maintains stream flows during dry periods.
Different plant species also release water vapor at different rates through transpiration. This variation helps stabilize local humidity and precipitation patterns. When plant diversity decreases, water cycles become erratic, leading to flooding in some areas and drought in others. Research on biodiversity (Wikipedia) demonstrates that these water regulation mechanisms depend critically on species richness.
Plant diversity forms the foundation of food webs supporting all animal life. Herbivores require diverse plant sources for complete nutrition, and predators depend on healthy herbivore populations. This cascading effect means that plant variety ultimately sustains human food security through fisheries, livestock, and crop production.
Pollinators—including bees, birds, and butterflies—require diverse flowering plants throughout seasons. Without this botanical variety, pollinator populations collapse, threatening crop production that feeds billions of people. Moreover, maintaining diverse plant genetics provides insurance against crop failures and emerging plant diseases.
5. Air Quality Improvement
Plants produce oxygen and absorb air pollutants through their leaves. Different plant species vary in their capacity to filter specific contaminants:
Some excel at removing nitrogen dioxide from vehicle emissions
Others effectively filter particulate matter and dust
Certain species absorb formaldehyde and other volatile compounds
By maintaining diverse plant populations, communities naturally improve air quality more effectively than any single species could accomplish. Urban environments particularly benefit from botanical diversity, as exploring nature-inspired design elements reminds us of the importance of green spaces in city planning. Research shows that mixed vegetation in cities reduces air pollution concentrations by 5-15% compared to barren areas.
6. Disease Resistance and Adaptation
Diverse plant populations resist pests and diseases more effectively than monocultures. When countless plant species coexist, pathogens cannot spread as rapidly. Additionally, biodiversity ensures that if one plant type succumbs to disease, alternative species survive to fill ecological roles.
Climate change accelerates pest and disease pressure on crops globally. Understanding unique plant kingdom characteristics helps us appreciate how evolutionary pressures shaped plants to resist specific threats. Maintaining genetic diversity within and between species provides resilience as environmental conditions shift unpredictably.
7. Pollution Remediation
Certain plants absorb heavy metals and other toxins from contaminated soil and water. Different species excel at removing specific pollutants. This process, called phytoremediation, uses plants to clean environmental damage without expensive industrial treatments.
Diverse plant communities accomplish pollution removal more comprehensively than single species alone. For instance, some plants extract lead while others remove mercury. Together, they restore ecosystems damaged by industrial activity. This natural cleanup mechanism saves governments and corporations billions in remediation costs while simultaneously restoring habitat for wildlife.
Protecting Plant Diversity for Future Generations
The seven mechanisms outlined above demonstrate that plant diversity functions as civilization’s life-support system. Every species lost diminishes these critical services. Conservation efforts protecting forests, grasslands, wetlands, and agricultural heirloom varieties represent investments in human survival itself.
Supporting sustainable agriculture, protecting natural habitats, and choosing native plants in landscaping all contribute to maintaining biodiversity. When we recognize plant diversity’s profound environmental value, protecting it becomes not just an ethical imperative but an essential practical necessity. By preserving the botanical richness that took millions of years to evolve, we ensure that our planet remains capable of supporting thriving human communities for generations to come. Visit our shop to explore nature-inspired artwork celebrating Earth’s botanical treasures.
joerussell
Australian abstract artists based in Byron Bay and curator of the GumPrints art print collection.
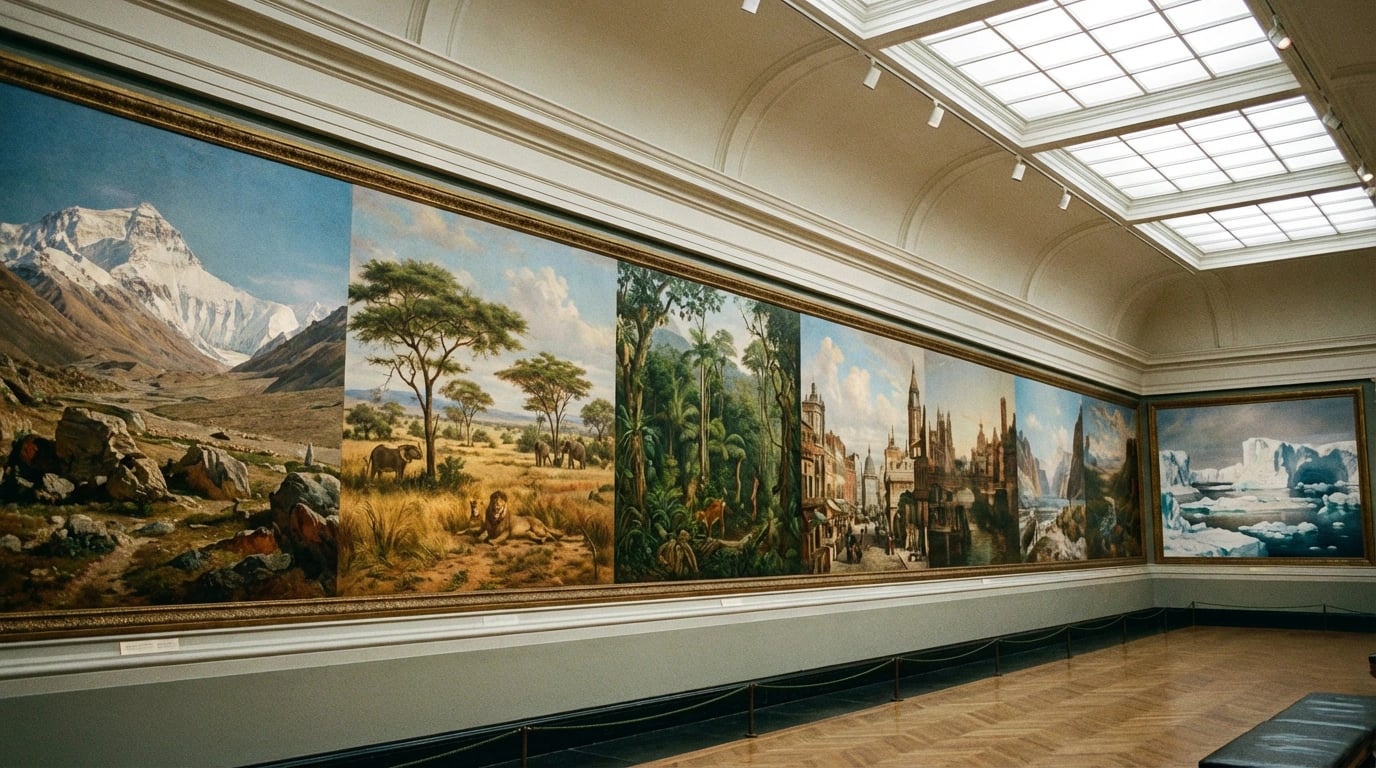
When we examine landscape art across continents and cultures, one truth becomes increasingly clear: the Western tradition has dominated our understanding of this genre for far too long. From museum walls to art education curricula, European and American landscape movements receive disproportionate attention while equally sophisticated traditions from Asia, Africa, and indigenous cultures remain marginalized. This imbalance not only distorts art history but also limits our appreciation of how diverse cultures interpret and represent their natural environments.
The conventional narrative positions landscape painting as a primarily European invention, celebrating the Dutch Golden Age, English Romanticism, and American Hudson River School as defining moments. However, this perspective ignores millennia of sophisticated landscape traditions worldwide. Chinese shan shui painting emerged over a thousand years before European landscape art gained prominence, developing complex philosophical frameworks for depicting mountains and water. Japanese ukiyo-e woodblock prints revolutionized spatial composition centuries before Western modernism. Aboriginal Australian art has represented land relationships for over 60,000 years through deeply symbolic visual languages. These aren’t merely “alternative” approaches—they represent foundational contributions that deserve equal recognition in any comprehensive discussion of landscape art.
Eastern Traditions Deserve Equal Footing
Chinese landscape painting, particularly the shan shui tradition, developed sophisticated aesthetic philosophies that fundamentally differ from Western approaches. Rather than pursuing realistic representation, these works embodied Taoist and Buddhist principles, viewing landscape as a meditation on cosmic harmony. The emphasis on negative space, atmospheric perspective, and the relationship between humans and nature offers profound insights that Western traditions often overlook.
Similarly, Persian miniature paintings integrated landscapes with narrative elements in ways that challenge Western distinctions between landscape and figurative art. Indian Pahari paintings depicted mountainous regions through vibrant color palettes and stylized forms that captured emotional and spiritual dimensions of place. These approaches demonstrate that realism—so prized in Western art history—represents merely one valid method among many for engaging with natural environments.
Technical Innovation Beyond European Borders
Moreover, technical innovations flourished outside Europe long before the Renaissance. Japanese artists mastered woodblock printing techniques that enabled unprecedented color gradations and atmospheric effects. Korean celadon glazes captured landscape elements with subtlety unmatched in contemporary European ceramics. These achievements challenge the notion that Western art history represents a linear progression toward technical mastery. Instead, they reveal parallel developments of equal sophistication across cultures.
Colonial Perspectives Still Shape Contemporary Views
The way we currently categorize and value landscape art reflects colonial power structures that persist in art institutions worldwide. European colonizers often dismissed indigenous landscape representations as “primitive” or “decorative” rather than recognizing them as sophisticated visual languages. Consequently, museums continue to display Aboriginal Australian dot paintings in anthropology sections rather than alongside European masters, implicitly positioning them as cultural artifacts rather than fine art.
This institutional bias affects contemporary artists and collectors alike. When considering the elements of great landscape art, many still default to Western criteria—perspective, light studies, atmospheric effects—without acknowledging that these standards privilege specific cultural approaches. African landscape traditions, which often integrate pattern, symbolism, and community narratives, get evaluated against inappropriate benchmarks that fail to recognize their distinct aesthetic values.
Furthermore, the art market reinforces these hierarchies through pricing and prestige. European landscape paintings command astronomical prices at auction houses, while equally masterful works from non-Western traditions remain undervalued. This economic disparity doesn’t reflect artistic merit but rather the ongoing influence of colonial-era value systems that positioned European culture as superior.
Indigenous Wisdom Offers Revolutionary Approaches
Indigenous landscape traditions worldwide offer perspectives that contemporary art desperately needs. Rather than viewing landscapes as objects for aesthetic contemplation, many indigenous cultures represent land as living entities with which humans maintain reciprocal relationships. This philosophical foundation creates artwork that functions fundamentally differently than Western landscape traditions, embedding spiritual, ecological, and communal knowledge within visual forms.
Aboriginal Australian artists, for instance, map ancestral songlines and Dreaming stories onto landscape representations, creating works that simultaneously function as navigation tools, historical records, and spiritual guides. These multidimensional purposes challenge Western assumptions that separate art from utility. Similarly, Native American landscape representations often encode seasonal knowledge, resource locations, and territorial relationships—information crucial for community survival embedded within aesthetic forms.
Ecological Consciousness in Traditional Forms
Additionally, indigenous approaches often demonstrate ecological consciousness that predates contemporary environmental art movements by millennia. Pacific Island navigational charts represented ocean currents, wave patterns, and celestial relationships with remarkable precision, creating landscape representations that honored environmental complexity. These traditions understood what Western culture is only recently acknowledging: that landscape representation carries responsibility toward the environments depicted.
For collectors seeking to expand their understanding, exploring diverse landscape art styles for home decor means looking beyond familiar European and American movements. It involves actively seeking out and valuing artistic traditions that offer different ways of seeing and representing the natural world.
The Future of Landscape Appreciation
Moving forward, art education and institutions must actively dismantle Eurocentric frameworks that have constrained landscape art appreciation. This requires more than token inclusion of non-Western works. It demands restructuring how we teach art history, challenging the chronological narratives that position European developments as central and treating other traditions as peripheral influences or exotic alternatives.
Contemporary landscape artists increasingly draw inspiration from global traditions, creating hybrid approaches that acknowledge multiple cultural influences. This cross-pollination produces exciting innovations, yet it also raises questions about cultural appropriation versus appreciation. The distinction lies in whether artists engage respectfully with source traditions, acknowledge influences explicitly, and ensure that marginalized artistic communities benefit from renewed interest in their approaches.
For those interested in acquiring landscape art, this broader perspective transforms the collecting experience. Rather than defaulting to familiar styles, collectors can explore how different cultures have visualized their environments throughout history. Resources like guides to buying quality landscape art prints become more valuable when they encourage exploration across cultural traditions rather than reinforcing established hierarchies.
Practical Steps Toward Inclusive Appreciation
Individuals can actively challenge these imbalances through several practical actions. First, seek out exhibitions and publications that center non-Western landscape traditions rather than treating them as supplementary. Second, support artists from underrepresented cultures by purchasing their work and advocating for their inclusion in major exhibitions. Third, educate yourself about the philosophical and cultural contexts that inform different landscape traditions rather than evaluating all work through Western aesthetic criteria.
Museum visitors can also demand institutional change by requesting diverse programming and questioning exhibition choices that perpetuate Eurocentric narratives. When institutions understand that audiences want more inclusive presentations, they respond accordingly. This collective pressure gradually shifts what gets displayed, discussed, and valued within art world hierarchies.
Ultimately, expanding our understanding of landscape art enriches everyone’s experience. Whether you’re considering landscape art for living rooms or studying art history professionally, engaging with global traditions provides fresh perspectives on humanity’s endlessly varied relationships with natural environments. The more we challenge established hierarchies, the more we discover profound artistic achievements that have been hiding in plain sight, marginalized by systems that privileged certain cultural perspectives over others.
The dominance of Western landscape traditions in mainstream art discourse represents a historical artifact of colonialism, not an accurate reflection of artistic achievement across cultures. By actively seeking out and valuing diverse approaches—from Chinese shan shui to Aboriginal dot paintings, from Persian miniatures to African symbolic landscapes—we create a more accurate, inclusive understanding of how humans have visualized their environments throughout history. This isn’t merely about political correctness; it’s about accessing the full richness of human creativity and learning from perspectives that challenge our assumptions about what landscape art can be and accomplish. For those ready to explore these diverse traditions, visiting a curated collection that values global perspectives offers an excellent starting point for expanding your artistic horizons.
joerussell
Australian abstract artists based in Byron Bay and curator of the GumPrints art print collection.
Understanding plant diversity requires more than casual observation. The scientific classification of plant families provides a systematic framework that botanists and plant enthusiasts use to organize and study the estimated 400,000 plant species on Earth. This structured approach helps us comprehend relationships between different plants, predict their characteristics, and appreciate the remarkable complexity of the plant kingdom. Whether you’re a gardening hobbyist, a biology student, or simply curious about the natural world, learning to classify plants using established scientific methods opens doors to deeper botanical knowledge and understanding.
Plant classification, formally known as taxonomy, operates through a hierarchical system that moves from broad categories to increasingly specific ones. At the broadest level, all plants belong to the Kingdom Plantae. From there, the classification descends through Division, Class, Order, Family, Genus, and finally Species. Plant families represent a crucial middle ground in this hierarchy, grouping together plants that share fundamental structural and evolutionary characteristics. Understanding how to identify and classify these families empowers you to recognize patterns across seemingly different species and appreciate the evolutionary relationships that connect the plant world.
Understanding the Taxonomic Hierarchy
The taxonomic system creates order from botanical chaos by organizing plants into nested categories. Each level becomes progressively more exclusive, meaning fewer plants share characteristics as you move down the hierarchy. Plant families sit at a particularly useful level because they’re specific enough to reveal meaningful patterns yet broad enough to encompass diverse forms. For instance, the Rosaceae family includes roses, strawberries, almonds, and apples—plants that seem wildly different but share key reproductive and structural features. Moreover, understanding this hierarchy helps you grasp why plant classification matters for practical applications like agriculture, medicine, and horticulture.
When learning about plant characteristics, it’s helpful to understand how evolution shapes these organizational patterns. As you explore the complete guide to plant evolution and adaptation, you’ll see how shared ancestry creates the resemblances that taxonomists use to group plants. The hierarchical system essentially reflects evolutionary relationships, making it both a practical organizational tool and a window into botanical history.
Step-by-Step Classification Process
Classifying plants requires careful observation and knowledge of specific botanical features. The process begins with examining physical characteristics that reveal family membership. Here’s how to approach plant classification methodically:
Step 1: Examine Flower Structure
Start by observing the flower’s basic anatomy. Count the flower parts, particularly the number of petals, sepals, and stamens. Family-level classification often hinges on these numbers—some families consistently show flowers with multiples of three petals, while others display multiples of four or five. Additionally, note the arrangement and fusion of flower parts, as these patterns reveal family identity. Using a magnifying glass helps reveal fine details that distinguish one family from another.
Step 2: Observe Leaf Arrangement and Type
Leaf characteristics provide crucial classification clues. Examine whether leaves are simple or compound, noting their arrangement along the stem. Some families favor opposite leaf arrangements, while others consistently show alternate patterns. Furthermore, inspect leaf margins—whether they’re smooth, serrated, or lobed. The leaf texture, whether waxy or fuzzy, and the presence of special structures like stipules (small leaf-like growths at the leaf base) all contribute to family identification. These visible features often correlate directly with family groupings.
Step 3: Analyze Stem and Root Characteristics
Examine the plant’s woody or herbaceous nature, noting whether stems are hollow or solid. Cross-sectional stem anatomy reveals whether the plant is a monocot or dicot, a fundamental division that separates many plant families. Consequently, understanding basic stem structure helps narrow down possible family classifications. Root systems also tell the story—fibrous roots versus taproot systems often correlate with family membership, reflecting evolutionary adaptations to specific environmental niches.
Fruits and seeds provide definitive classification information. Examine whether the fruit is a berry, capsule, legume, or drupe. The way seeds attach inside fruits, their number, and their protective structures vary significantly between families. Therefore, identifying fruit type becomes one of the most reliable classification methods. Seeds themselves reveal patterns—some families produce winged seeds for wind dispersal, while others develop seeds with specialized structures for animal dispersal.
Using Field Guides and Digital Resources
Modern plant classification relies on both traditional field guides and digital tools. Quality field guides specific to your region or plant family provide illustrations and descriptions that facilitate identification. Digital applications and online databases now offer interactive keys where you answer questions about plant features, progressively narrowing possibilities until reaching family identification. Understanding biological taxonomy (Wikipedia) provides essential background that helps you appreciate why these systematic classification methods matter to the scientific community.
Key Plant Family Characteristics to Memorize
Certain plant families appear so frequently in nature and cultivation that recognizing them immediately becomes valuable. The Poaceae family (grasses) represents one of the most important families economically and ecologically. Grasses display parallel leaf veins, hollow stems, and distinctive flower structures called spikelets. Members include wheat, rice, corn, and bamboo—plants that sustain human civilization. Similarly, the Fabaceae family (legumes) features compound leaves and distinctive pea-like flowers, with the added benefit of nitrogen-fixing root nodules.
The Asteraceae family (sunflowers and daisies) contains the largest number of flowering plant species. These plants display characteristic flower heads composed of many tiny flowers clustered together. Additionally, you’ll encounter the Solanaceae family (nightshades), which includes tomatoes, peppers, potatoes, and deadly nightshade. This family consistently shows alternate simple leaves and five-petaled flowers. As you deepen your exploration of how to identify unique plant kingdom characteristics, you’ll develop mental shortcuts for recognizing these common families instantly.
Common Plant Families to Know
Building familiarity with major plant families accelerates your classification skills. Consider learning these prominent families that dominate gardens, farms, and wild ecosystems:
Rosaceae (Roses): Includes apple, strawberry, peach, and ornamental roses with typically five petals
Cucurbitaceae (Gourds): Features pumpkins, cucumbers, and melons with distinctive tendrils and large flowers
Brassicaceae (Cabbage): Contains broccoli, cabbage, and mustard with characteristic four-petaled flowers
Apiaceae (Carrot): Includes carrots, parsley, and dill with umbrella-shaped flower clusters
Liliaceae (Lilies): Features tulips, lilies, and onions with bulbs and six-petaled flowers
As you continue studying botanical classification, remember that these family characteristics evolved over millions of years. Therefore, understanding family traits tells you not just what plants look like today, but how they adapted to their environments. When you’re ready to explore how botanical art captures plant diversity, visit our art print shop to discover stunning representations of plants from across the botanical spectrum. Creating a collection of botanical artwork alongside your classification knowledge deepens your connection to the plant world.
joerussell
Australian abstract artists based in Byron Bay and curator of the GumPrints art print collection.
Understanding the unique characteristics of plant kingdoms is essential for botanists, gardeners, and nature enthusiasts alike. Whether you’re studying plant biology, cultivating your own garden, or simply deepening your appreciation for the natural world, recognizing distinctive features across different plant groups can transform your understanding of how plants function and interact with their environments. This guide will walk you through the systematic process of identifying and understanding what makes each plant kingdom truly exceptional.
Plant kingdoms are classified based on several fundamental characteristics, including their reproductive methods, cellular structures, vascular systems, and evolutionary adaptations. By learning to identify these distinguishing features, you’ll gain valuable insight into plant classification and appreciate the remarkable diversity within the plant world. The key is to develop a methodical approach to observation and analysis that works whether you’re examining specimens in your garden or studying botanical references.
Learn the Four Major Plant Kingdom Categories
The plant kingdom divides primarily into four major categories, each with distinctive characteristics that set them apart. Understanding these fundamental groups forms the foundation for identifying any plant’s unique qualities. The four categories include bryophytes (mosses and liverworts), pteridophytes (ferns), gymnosperms (conifers and related plants), and angiosperms (flowering plants).
Bryophytes represent the most primitive plants and lack true vascular tissue. These small plants thrive in moist environments and reproduce through spores. Meanwhile, pteridophytes like ferns possess vascular tissue but still reproduce via spores rather than seeds. Gymnosperms produce naked seeds without flower structures, while angiosperms represent the most advanced group, featuring enclosed seeds within fruit structures.
As you study plant evolution and adaptation, you’ll discover how each group developed specialized traits suited to their ecological niches. This evolutionary perspective helps explain why certain plants thrive in specific conditions while others struggle in unfamiliar environments.
Identifying Bryophytes in Nature
Bryophytes are among the easiest plants to recognize due to their diminutive size and preference for damp locations. Look for soft, moss-like plants growing on rocks, fallen logs, or moist soil. These plants lack roots, instead using rhizoids—hair-like structures—to anchor themselves and absorb moisture. Their small stature and reliance on water for reproduction make them distinctly different from all other plant groups.
Recognizing Pteridophytes and Ferns
Ferns display characteristic fronds with distinctive patterns, making them relatively easy to identify. The underside of mature fronds contains sporangia—small structures that release spores for reproduction. Unlike flowering plants, ferns never produce seeds or flowers. Their feathery appearance and preference for shaded, moist areas provide additional identification clues.
Reproductive methods represent one of the most reliable ways to distinguish between plant kingdoms. Examining how a plant reproduces—whether through spores, naked seeds, or enclosed seeds—immediately narrows your classification options. This step-by-step approach eliminates guesswork and provides concrete answers about plant identity.
Begin by searching for evidence of reproductive structures on your specimen. Look for flowers, cones, seed pods, or spore-releasing structures. The presence or absence of these features tells you immediately which kingdom the plant belongs to. Flowers and fruit indicate angiosperms, while naked cones suggest gymnosperms. Spore cases indicate either bryophytes or pteridophytes.
Spotting Seed-Producing Plants
Seed-producing plants—both gymnosperms and angiosperms—represent the most advanced evolutionary development. Seeds provide the plant embryo with stored nutrition and protective coating, enabling survival in diverse environments. When examining a potential seed-producing plant, look for mature seed structures that vary dramatically between the two groups. Gymnosperms display seeds in open cones, while angiosperms enclose seeds within fleshy fruits or protective pods.
Recognizing Spore Reproduction Indicators
Plants that reproduce through spores rather than seeds display distinctive characteristics worth learning. Spores are single-celled reproductive units far more primitive than seeds. They’re often invisible to the naked eye but cluster together in visible structures. When you examine the undersides of fern fronds or the capsules of moss plants, you’re looking at spore-producing organs that evolved over millions of years.
Observe Vascular and Cellular Characteristics
The presence or absence of vascular tissue—the plant’s internal transportation system—fundamentally shapes how plants grow and function. Vascular plants possess specialized tissues called xylem and phloem that transport water, minerals, and nutrients throughout the plant body. Non-vascular plants lack these systems entirely, limiting their size and growth potential significantly.
To determine whether your plant specimen has vascular tissue, examine its stem closely. Vascular plants typically display visible veining in their leaves and structured stems capable of supporting substantial height. Non-vascular plants appear fragile and delicate, rarely exceeding a few inches in height. This observable difference provides an immediate classification clue that requires no special equipment.
Understanding botanical structures and features helps you appreciate the intricate systems that enable plants to thrive. The visual complexity you observe in plant anatomy reflects millions of years of evolutionary refinement.
Distinguishing True Roots from Rhizoids
Real roots possess vascular tissue and actively absorb water and minerals from soil. Rhizoids, found in bryophytes, are simple hair-like structures serving primarily anchoring functions. By examining the base of your plant specimen, you can determine whether it possesses true roots or simple rhizoids. This distinction immediately eliminates entire plant categories from consideration.
Examining Leaf Structure and Venation
Leaf veining patterns vary significantly between plant kingdoms. Flowering plants display complex vein networks—either parallel or netted—that reflect their advanced vascular systems. Ferns show characteristic vein patterns on their fronds, while bryophytes lack true leaves entirely, instead possessing simple leaf-like structures without internal vein systems. Careful leaf examination provides diagnostic information about plant classification.
Identify Growth Patterns and Adaptations
Different plant kingdoms exhibit distinctive growth patterns reflecting their evolutionary history and ecological adaptations. Observing these patterns helps you understand not only what type of plant you’re examining but also how it survives within its specific environment. Growth habit—whether upright, creeping, or branching—provides significant classification clues.
Bryophytes grow in low mats or cushions, never producing substantial height. Ferns develop characteristic coiled fiddleheads as new growth emerges, a feature unique to this plant group. Gymnosperms often display conical growth patterns with branches extending to the ground, while many angiosperms produce diverse growth forms ranging from herbaceous to woody structures.
When examining plants in natural settings or your own garden, take time to observe distinctive leaf characteristics and growth patterns that reflect each plant’s unique adaptations. This observation practice strengthens your classification abilities immensely.
Recognizing Environmental Adaptations
Plants develop specialized adaptations enabling survival in specific environments. Ferns thrive in shade and moisture, displaying thin leaves optimized for low-light conditions. Gymnosperms develop needle-like or scale-like leaves reducing water loss in harsh climates. Angiosperms exhibit the widest range of adaptations, from desert succulents to aquatic plants. These visible adaptations provide insights into where plants naturally occur and what conditions they prefer.
Understanding Seasonal Changes
Observing how plants change seasonally reveals important classification information. Deciduous angiosperms shed leaves annually, while evergreen gymnosperms and ferns maintain foliage year-round. Bryophytes respond dramatically to moisture availability, appearing vibrant when wet and dormant when dry. These behavioral patterns help confirm your plant classifications and deepen your understanding of plant biology.
Practice Classification in Your Own Space
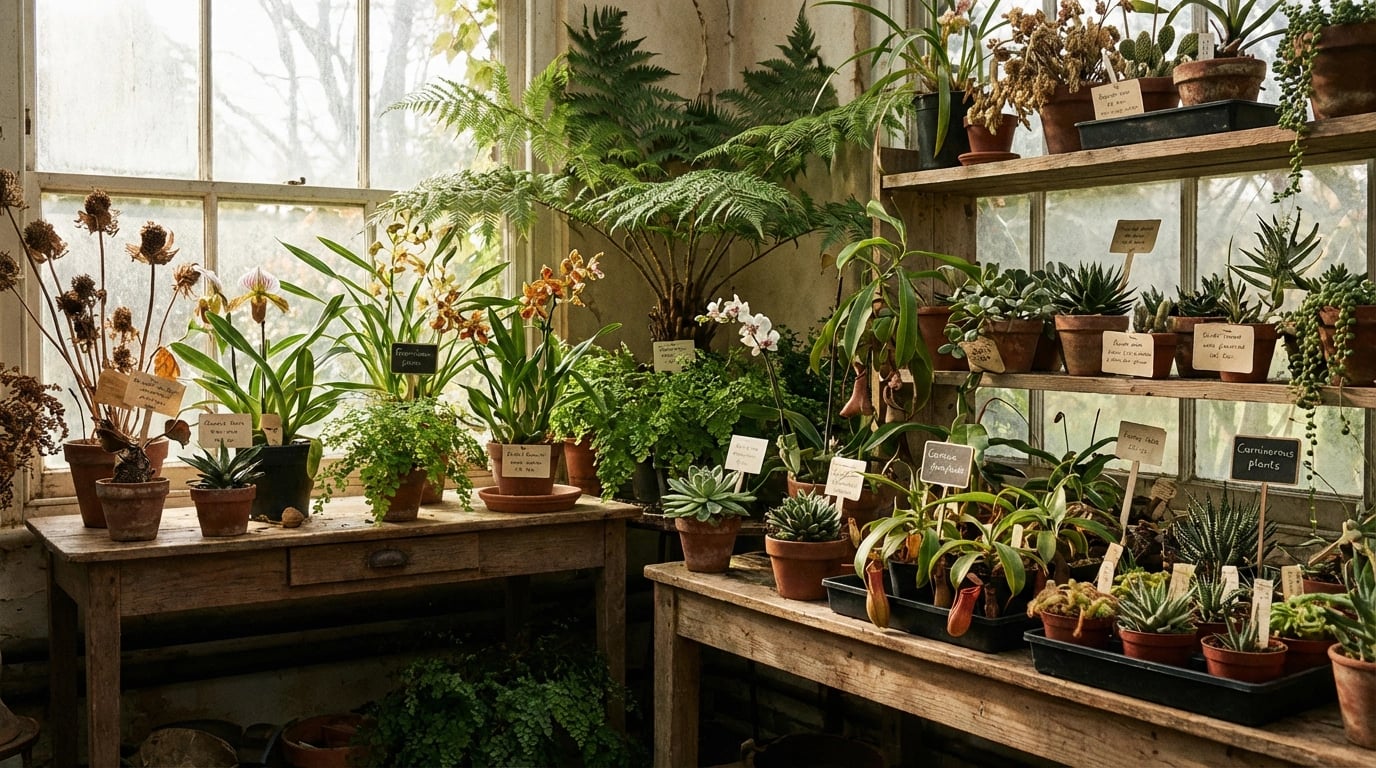
The most effective way to master plant kingdom identification is through consistent hands-on practice. Whether you maintain a garden, tend houseplants, or explore local natural areas, surrounding plants provide endless learning opportunities. Start by identifying common plants within each kingdom, gradually expanding your expertise to less familiar species.
Create a personal plant identification system documenting the specimens you encounter. Photograph or sketch plants, noting their reproductive structures, vascular characteristics, growth patterns, and environmental preferences. Over time, this practice builds pattern recognition skills that enable rapid, confident identification. You’ll develop an intuitive sense for how plants are classified, even when encountering unfamiliar species.
Consider exploring collections of botanical artwork and illustrations that showcase plant diversity across different kingdoms. Visual representation of plant characteristics reinforces your learning while inspiring appreciation for botanical beauty.
Documenting Your Observations
Maintain detailed observation notes for each plant specimen you study. Record the plant’s name, location, growth habit, reproductive structures, leaf characteristics, and any notable adaptations. This documentation serves multiple purposes: it reinforces your learning, creates a reference guide for future identification, and helps you spot patterns across different plant groups. Over weeks and months, these notes become an invaluable personal botanical reference.
Comparing Plants Across Kingdoms
The most effective learning approach involves direct comparison between plants from different kingdoms. When you examine a moss, a fern, a gymnosperm, and an angiosperm side-by-side, the distinctive characteristics become immediately apparent. Visit botanical gardens, natural history museums, or explore natural areas featuring diverse plant species to expose yourself to varied specimens. This comparative study accelerates your classification mastery significantly.
By following these systematic steps and practicing consistently, you’ll develop comprehensive knowledge of plant kingdom characteristics. This understanding enriches your gardening pursuits, deepens your nature appreciation, and enables confident plant identification in any setting. The natural world’s botanical diversity becomes increasingly fascinating as you recognize the unique features distinguishing each plant group, transforming casual observation into informed botanical understanding.
joerussell
Australian abstract artists based in Byron Bay and curator of the GumPrints art print collection.
Plants are among Earth’s most remarkable organisms, having evolved over hundreds of millions of years to thrive in virtually every terrestrial environment. Understanding plant evolution and adaptation reveals how these living systems developed sophisticated strategies to survive, reproduce, and flourish across diverse climates and conditions. From the earliest land colonizers to modern flowering species, plants demonstrate nature’s incredible capacity for innovation and resilience.
Plant evolution represents one of the most transformative stories in biological history. Early plants emerged from aquatic algae approximately 450 million years ago, developing the structural and physiological innovations necessary for life on land. This transition required revolutionary adaptations: protective outer layers to prevent water loss, vascular systems to transport nutrients and water internally, and reproductive mechanisms suited to terrestrial environments. Over millennia, plants diversified into hundreds of thousands of species, each refined by natural selection to exploit specific ecological niches. Today’s plant kingdom showcases the cumulative effects of adaptation—from towering trees with root systems that anchor them against wind to desert succulents storing water in fleshy leaves.
The mechanisms driving plant adaptation operate continuously across generations. Environmental pressures such as drought, flooding, temperature extremes, and competition for sunlight have sculpted plant physiology and morphology in remarkable ways. Xerophytic plants in arid regions developed waxy cuticles and reduced leaf surface areas to minimize water loss. Conversely, hydrophytic plants adapted to wetland environments with air-filled tissues for buoyancy and roots designed for waterlogged soils. Photosynthetic efficiency, root architecture, seed dispersal mechanisms, and chemical defenses against herbivores all represent solutions evolved through countless generations of natural selection.
Contemporary plant adaptation extends beyond inherited traits into dynamic responses within single organisms. Plants exhibit remarkable phenotypic plasticity—the ability to modify their growth patterns and physiology in response to immediate environmental conditions. A seedling receiving limited light will elongate its stems to reach sunlight, while one exposed to strong wind will develop thicker, stronger stems. These responsive adaptations occur without genetic changes and demonstrate plants’ sophisticated sensory capabilities. Plants perceive light quality, gravity, touch, and chemical signals, integrating this information through hormonal signaling systems that guide development and survival.
Flowering plants, or angiosperms, represent perhaps the most dramatic example of adaptive radiation in plant history. Their appearance roughly 130 million years ago transformed terrestrial ecosystems. Flowers evolved as sophisticated reproductive structures, attracting specific animal pollinators through color, scent, and nectar rewards. This coevolutionary relationship between flowers and insects created mutual dependencies that accelerated diversification in both groups. The success of angiosperms demonstrates how adaptation extends beyond survival mechanisms to include reproductive strategies and ecological partnerships. Today, flowering plants dominate terrestrial vegetation and provide the foundation for most terrestrial food webs.
Understanding plant evolution and adaptation carries profound significance for modern conservation and agriculture. As climate change rapidly alters environmental conditions worldwide, knowledge of how plants adapt helps scientists predict species responses and identify populations with beneficial traits. Botanical researchers explore wild plant relatives of crops to discover genetic resources conferring drought tolerance, disease resistance, or enhanced nutrition. Additionally, studying historical plant adaptation informs efforts to preserve biodiversity and restore degraded ecosystems. Botanical art and scientific illustration have long served to document plant diversity, celebrating the visual richness that evolution has produced.
The study of plant evolution continues revealing new insights into how life diversifies and persists. Advances in molecular genetics allow scientists to trace evolutionary relationships among plant species with unprecedented precision, revealing deep connections between seemingly disparate groups. Fossil records provide snapshots of ancient plant communities and the transitions that shaped modern floras. Gum trees’ living ink palette reminds us that evolution produces not merely functional organisms but visually stunning diversity worthy of appreciation and study. By comprehending how plants adapted to past challenges, we gain perspective on their potential to adapt to future ones, underscoring why botanical knowledge remains essential for environmental stewardship and human survival.
joerussell
Australian abstract artists based in Byron Bay and curator of the GumPrints art print collection.
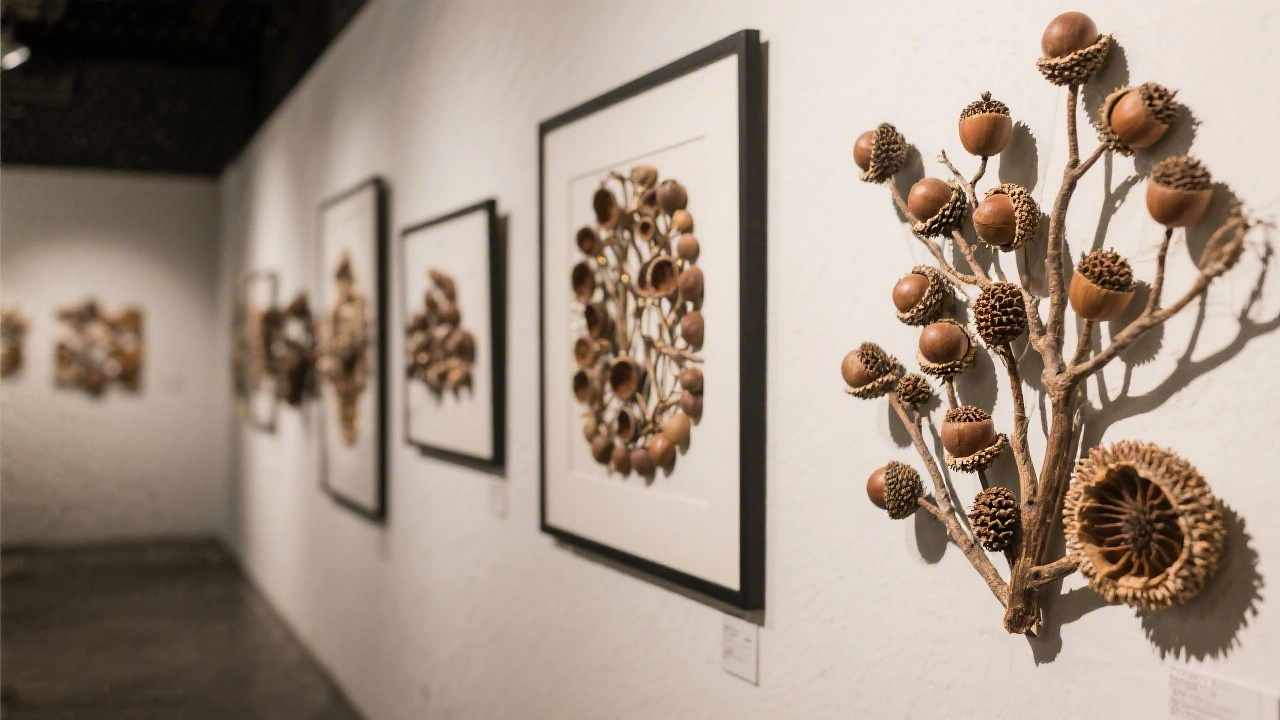
Gum nut art represents a captivating and distinctive form of botanical artistic expression that celebrates the natural beauty of Australia’s eucalyptus trees. This unique art form combines traditional artistic techniques with the intricate details found in gum nuts—the woody seed capsules produced by gum trees. From watercolor paintings to contemporary abstract interpretations, gum nut art has emerged as a beloved subject for both professional artists and enthusiasts seeking to incorporate Australian native flora into their creative work and home décor.
Gum nut art encompasses a diverse range of artistic styles and mediums, each offering its own interpretation of these fascinating botanical subjects. Whether you’re drawn to realistic botanical illustrations, modern minimalist designs, or vibrant abstract compositions, gum nut art provides endless creative possibilities. The appeal of this art form lies in its ability to capture the delicate texture, organic geometry, and subtle color variations found in nature, making it an excellent choice for those seeking meaningful and culturally significant artwork that brings a touch of Australian wilderness into their living spaces.
Understanding Gum Nut Art and Its Origins
Gum nut art has deep roots in Australian artistic tradition and botanical illustration. Gum trees serve as nature’s living ink palette, offering artists an remarkable subject matter rich in visual complexity. The eucalyptus tree, commonly known as the gum tree, produces distinctive seed capsules that have inspired artists for centuries. These botanical forms possess an inherent aesthetic appeal—their sculptural quality, intricate surface patterns, and natural color palette make them ideal subjects for artistic exploration and interpretation.
The history of gum nut art is intertwined with Australia’s colonial artistic heritage. Early European settlers arriving in Australia were fascinated by the unique flora they encountered, and gum nuts became increasingly popular subjects in botanical art and scientific illustration. Over time, this interest evolved beyond purely scientific documentation into fine art expression. Gum trees have challenged and inspired artists throughout history, presenting unique technical and aesthetic challenges that continue to captivate contemporary creators.
Today, gum nut art has expanded to encompass modern artistic movements while maintaining respect for traditional botanical representation. Gum trees reimagined across seven stunning art styles demonstrates the versatility of this subject matter. Artists now approach gum nuts from perspectives ranging from photorealism to complete abstraction, proving that these humble botanical forms possess extraordinary potential for creative expression and contemporary interpretation.
The Artistic Techniques Behind Gum Nut Art
Creating compelling gum nut art requires mastering various artistic techniques and mediums. Watercolor remains one of the most popular approaches for gum nut artists, offering translucent layers that beautifully capture the subtle tonal variations found in natural specimens. Watercolor eucalyptus techniques capture silvery branches with remarkable delicacy, allowing artists to convey the luminous quality characteristic of many gum tree specimens. The medium’s fluid nature enables artists to create organic, flowing compositions that echo the natural growth patterns of these botanical forms.
Beyond traditional watercolor, artists employ diverse techniques to express their vision of gum nuts:
Detailed pencil and graphite rendering for intricate botanical studies
Oil painting for rich color depth and texture
Mixed media combinations blending collage with paint
Digital art and photography-based interpretations
Printmaking techniques including etching and lithography
Abstract approaches emphasizing color and form over realism
The choice of technique significantly influences the final artwork’s character and impact. Artists often combine multiple approaches to achieve their desired aesthetic. Understanding painting eucalyptus and nature’s hidden geometry helps contemporary artists appreciate the mathematical and structural elements inherent in these botanical subjects, enabling them to create more compelling and visually sophisticated compositions.
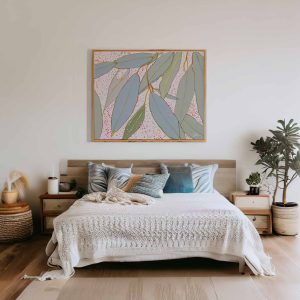
Gum nut art offers exceptional versatility for interior design applications. Whether you’re decorating a living room, bedroom, office, or dining space, these artworks bring natural beauty and cultural significance into your environment. Landscape art for living rooms provides guidance on incorporating natural subjects into home spaces, principles that apply equally well to gum nut art selection and placement. The neutral color palettes commonly found in gum nut artwork—soft grays, muted greens, warm browns, and creamy whites—allow these pieces to complement virtually any existing décor scheme.
When selecting gum nut art for your home, consider these essential factors:
Room size and available wall space
Existing color palette and design aesthetic
Lighting conditions in the intended space
Your personal artistic preferences and style
The artwork’s subject matter and mood
Frame style and material compatibility
Gum nut art works particularly well in bedrooms seeking to establish calming, nature-inspired environments. The organic forms and soft color palettes promote relaxation and create visual interest without overwhelming the senses. In living areas, larger gum nut compositions become focal points that spark conversation and connection to Australian cultural heritage. Eucalyptus prints offer exceptional versatility for interior design applications, bridging botanical authenticity with contemporary aesthetic sensibilities.
Choosing and Displaying Gum Nut Artwork
Selecting quality gum nut art requires understanding what distinguishes exceptional pieces from mediocre reproductions. Essential tips for buying art prints guide collectors toward informed purchasing decisions, helping you evaluate artistic merit, technical skill, and overall value. Look for artwork demonstrating careful attention to botanical detail, sophisticated color harmony, and compelling composition. Visit our curated shop collection to explore professionally selected gum nut art options that meet rigorous quality standards.
Proper display significantly enhances your gum nut artwork’s impact and longevity. Professional guidance on hanging art prints ensures optimal presentation and preservation of your valuable pieces. Position artwork at eye level in well-lit areas where it receives appropriate illumination without direct sunlight exposure that could cause fading. Consider framing choices carefully—simple, elegant frames in natural wood tones, black, or white typically complement gum nut art beautifully while allowing the botanical subject matter to remain the focal point.
For those seeking comprehensive guidance on art selection and display, learn how to display art prints beautifully and effectively, incorporating principles that preserve artwork condition while maximizing visual impact. Whether you’re building your first art collection or expanding an existing one, gum nut art offers meaningful, beautiful options that celebrate Australia’s distinctive natural heritage. Learn more about eucalyptus trees on Wikipedia to deepen your appreciation for the botanical subjects inspiring this remarkable art form.
joerussell
Australian abstract artists based in Byron Bay and curator of the GumPrints art print collection.
When it comes to transforming your living space with art, minimalist landscape art prints offer a unique combination of sophistication and tranquility. These artworks strip away unnecessary details to reveal the essence of natural beauty, creating powerful visual statements through simplicity. Whether you’re redesigning your entire home or adding a finishing touch to a single room, understanding the nuances of minimalist landscape prints will help you make informed choices that elevate your interior design.
Minimalist landscape art prints focus on essential elements like clean lines, muted color palettes, and negative space to convey serene natural scenes. These prints typically feature simplified compositions that might include distant horizons, abstract representations of mountains, or stylized depictions of coastlines. The beauty lies in what is left out rather than what is included, creating a sense of calm and spaciousness that complements modern interiors perfectly.
Defining Characteristics of Minimalist Landscape Art
Minimalist landscape prints are distinguished by several core visual elements that set them apart from traditional landscape artwork. These characteristics work together to create pieces that feel both modern and timeless.
The primary feature is the emphasis on negative space, which refers to the empty or unoccupied areas within the composition. This deliberate use of “nothing” draws attention to the subject matter and creates breathing room for the eye. Furthermore, these prints often employ limited color palettes, typically featuring two to four colors that harmonize effortlessly.
Essential Visual Elements
Understanding the building blocks of minimalist landscape art helps you identify authentic pieces and appreciate their design philosophy. These elements include:
Simplified geometric forms that reduce natural landscapes to basic shapes
Strong horizontal or vertical lines that create structure and balance
Subdued color schemes often featuring earth tones, pastels, or monochromatic ranges
Absence of intricate details or busy textures
Strategic focal points that guide the viewer’s attention
High contrast between elements to create visual interest without complexity
These visual elements combine to produce artwork that feels intentional and contemplative. Consequently, minimalist landscape prints work exceptionally well in spaces where you want to promote relaxation and mental clarity. The fundamental principles of landscape composition still apply, but they’re distilled to their purest form.
Color Theory and Palette Selection
Color plays a crucial role in minimalist landscape art, despite the typically limited palette. The strategic use of hue, saturation, and value creates mood and depth without overwhelming the composition.
Most minimalist landscape prints favor either monochromatic schemes or analogous color combinations. Monochromatic palettes use variations of a single color, creating unity and sophistication. Meanwhile, analogous schemes combine colors that sit next to each other on the color wheel, such as blues and greens or oranges and yellows.
Popular Color Combinations
Certain color schemes have become particularly popular in minimalist landscape art due to their psychological effects and design versatility. Neutral palettes featuring beige, gray, and white create a sense of calm and work with virtually any decor style. Earth-toned combinations using terracotta, ochre, and sand evoke warmth and connection to nature.
Cool palettes dominated by blues, grays, and soft greens promote tranquility and work beautifully in bedrooms or meditation spaces. Additionally, warm minimalist palettes incorporating blush pinks, soft corals, and warm grays add gentle energy without sacrificing simplicity. For guidance on matching these colors to your existing decor, color coordination principles can prove invaluable.
Psychological Impact of Color Choices
Understanding how different colors affect mood helps you select prints that serve your space’s intended purpose. Blue-dominated landscapes create feelings of serenity and openness, making them ideal for stress-reduction areas. Conversely, warmer tones with subtle oranges and yellows can energize a space while maintaining minimalist restraint.
Neutral palettes allow other design elements to take center stage, making them perfect for spaces where the art should complement rather than dominate. Therefore, consider both the aesthetic appeal and the emotional response when selecting your minimalist landscape prints.
Composition Techniques That Define the Style
The compositional approach in minimalist landscape art follows specific principles that maximize visual impact while maintaining simplicity. These techniques separate compelling pieces from those that merely appear empty or unfinished.
The rule of thirds remains important, but minimalist artists often push subjects to the extreme edges of the frame. This creates tension and interest through unconventional placement. Moreover, leading lines guide the viewer’s eye through the composition, even when those lines are implied rather than explicitly drawn.
Creating Depth Without Detail
Minimalist landscape prints achieve a sense of depth through layering simple shapes at different scales and using atmospheric perspective. This technique involves making distant elements lighter and less distinct, mimicking how our eyes perceive distant landscapes naturally.
Overlapping geometric forms create spatial relationships without requiring detailed rendering. A simple silhouette of a mountain range in the foreground with a lighter wash representing sky demonstrates this principle perfectly. Additionally, the strategic use of value contrast—placing light against dark—creates separation between elements.
Balance and Symmetry Considerations
While symmetrical compositions appear occasionally in minimalist landscape art, asymmetrical balance is more common. This approach distributes visual weight unevenly but harmoniously across the composition. A small, dark element might balance a larger, lighter area, creating dynamic equilibrium.
Therefore, successful minimalist landscapes feel stable and intentional rather than accidentally sparse. The placement of each element serves a purpose, contributing to the overall composition’s harmony. This deliberate approach aligns with the broader minimalist art movement that emerged in the mid-20th century.
Room-by-Room Placement Strategies
Different rooms in your home benefit from specific approaches to displaying minimalist landscape art prints. Understanding these nuances ensures your artwork enhances each space’s function and aesthetic.
Living rooms typically serve as social spaces where conversation and relaxation occur. Here, larger minimalist landscape prints create focal points without overwhelming the room’s energy. Position these prints at eye level, approximately 57-60 inches from the floor to the center of the artwork.
Bedroom Display Considerations
Bedrooms require artwork that promotes restful sleep and personal tranquility. Consequently, minimalist landscape prints with cool color palettes and horizontal orientations work exceptionally well. The horizontal format mimics the horizon line, which our brains associate with rest and stability.
Consider placing a single large print above the headboard or creating a small gallery wall with three matching pieces. The simplicity of minimalist art prevents visual overstimulation before sleep. Furthermore, proper display techniques ensure your prints maintain their serene quality.
Office and Workspace Applications
Home offices and workspaces benefit from minimalist landscape art that inspires focus without distraction. Vertical formats can make rooms with lower ceilings feel taller, while simplified landscapes provide mental breaks during intensive work sessions.
Position prints where you can see them during brief pauses but not directly in your primary line of sight when working. This placement allows the artwork to serve as a visual reset point. Additionally, neutral or cool-toned minimalist landscapes help maintain a professional atmosphere while adding personality to the space.
Framing and Presentation Methods
The way you frame and present minimalist landscape art prints significantly impacts their overall effect. The right framing choices complement the artwork’s simplicity rather than competing with it.
Simple, clean frames in natural wood, black, or white work best with minimalist landscapes. These neutral options allow the artwork to remain the focal point. Moreover, the frame width should be proportional to the print size—larger prints can handle wider frames, while smaller pieces benefit from slimmer profiles.
Matting and Border Decisions
Matting creates visual breathing room between the print and frame, which particularly enhances minimalist artwork. White or off-white mats are classic choices that work with virtually any color palette. However, selecting a mat color that appears in the print can create sophisticated continuity.
The mat width typically ranges from 2-4 inches, with larger prints accommodating wider mats. Nevertheless, some minimalist prints benefit from frameless presentation or float mounting, where the print appears to hover within the frame. For comprehensive guidance, professional hanging techniques can ensure optimal results.
Alternative Presentation Styles
Beyond traditional framing, several contemporary presentation methods suit minimalist landscape prints. Canvas-mounted prints offer a modern, gallery-style appearance without glass or frames. Acrylic face mounting creates a sleek, high-end look where the print is bonded to clear acrylic, adding depth and luminosity.
Magnetic poster hangers provide a minimalist presentation method that’s easily changeable and works particularly well in modern or Scandinavian-inspired interiors. These options allow you to update your display seasonally or as your tastes evolve without investing in new frames.
Historical Context and Artistic Movements
Understanding the historical roots of minimalist landscape art enriches your appreciation and helps you identify different substyles within the genre. This movement didn’t emerge in isolation but evolved from several influential art movements.
The minimalist art movement gained prominence in the 1960s and 1970s, emphasizing simplicity and objectivity. However, landscape-focused minimalism draws additional inspiration from Japanese aesthetics, particularly the concept of “ma” or negative space, and traditional ink wash paintings that reduce scenes to their essential elements.
Contemporary Interpretations
Modern minimalist landscape artists combine traditional principles with contemporary sensibilities. Digital tools allow for precise geometric compositions and perfectly graduated color transitions that would be challenging to achieve with traditional media. Consequently, today’s minimalist landscape prints often feature cleaner lines and more consistent textures than their historical predecessors.
Scandinavian design principles have significantly influenced contemporary minimalist landscape art, introducing muted color palettes and emphasis on natural materials. This intersection creates artwork that feels both artistic and design-forward, seamlessly integrating into modern interiors. When exploring different approaches, various landscape art styles offer additional context for minimalist aesthetics.
Selecting the Right Prints for Your Space
Choosing the perfect minimalist landscape prints requires considering multiple factors beyond simple aesthetic preference. A systematic approach ensures your selections enhance your space rather than feeling like afterthoughts.
Start by assessing your existing color scheme and identifying dominant and accent colors in your space. Your minimalist landscape prints should either complement these colors or provide deliberate contrast. Additionally, consider the room’s lighting—natural light reveals subtle color variations, while artificial lighting can alter how colors appear throughout the day.
Size and Scale Considerations
Print size dramatically affects visual impact and spatial perception. A common mistake is selecting prints that are too small for the wall space, which can make rooms feel disconnected and poorly planned. As a general guideline, artwork should occupy approximately two-thirds to three-quarters of the available wall space above furniture.
For large, empty walls, consider either a single oversized print or a carefully arranged gallery wall of smaller pieces. The minimalist aesthetic particularly suits single-statement pieces, which allow negative space around the artwork to enhance rather than diminish its presence. Resources like large wall art ideas can inspire appropriate scaling decisions.
Quality and Print Medium
The print quality significantly impacts how minimalist landscape art appears in your home. Giclée prints using archival inks on high-quality paper or canvas offer superior color accuracy and longevity. These prints maintain their appearance for decades when properly cared for, making them worthwhile investments.
Pay attention to paper weight and texture, as these characteristics affect the print’s overall feel. Heavier papers (over 200 gsm) convey quality and durability, while different textures can enhance specific aesthetic qualities. Matte finishes typically suit minimalist art better than glossy alternatives, which can create distracting reflections.
Building a Cohesive Collection
If you’re acquiring multiple minimalist landscape prints, establishing visual connections between pieces creates cohesion. This might involve selecting prints from the same artist, maintaining consistent color palettes, or choosing works with similar compositional approaches.
However, perfect matching isn’t necessary or even desirable. Variation in orientation, size, or specific color use adds interest while maintaining overall harmony. When browsing options, visit the collection of available prints to find pieces that work together organically. The principles outlined in essential buying tips apply equally to minimalist selections.
Care and Maintenance Guidelines
Proper care ensures your minimalist landscape art prints remain vibrant and pristine for years to come. Fortunately, these maintenance requirements are straightforward and require minimal ongoing effort.
Protect prints from direct sunlight, which causes fading regardless of ink quality. Position artwork away from windows or use UV-filtering glass in frames for pieces that will receive sun exposure. Additionally, maintain consistent temperature and humidity levels, as extreme fluctuations can cause paper to warp or inks to deteriorate.
Cleaning and Dust Prevention
Framed prints behind glass require minimal cleaning—simply dust the glass periodically with a soft, dry microfiber cloth. Avoid spray cleaners that might seep behind the frame. For unframed or canvas prints, use a soft brush or compressed air to gently remove dust without touching the print surface directly.
Never use water or cleaning solutions directly on unprotected prints, as these will damage the paper and inks irreversibly. Therefore, prevention through proper framing provides the best long-term protection. Handling prints with clean hands or cotton gloves prevents oil transfer that can cause discoloration over time.
Storage Recommendations
If you rotate artwork seasonally or need to store prints temporarily, proper storage techniques prevent damage. Store prints flat rather than rolled when possible, as rolling can cause creasing in thicker papers. Place acid-free tissue paper between prints to prevent friction damage.
Keep stored prints in a climate-controlled environment away from basements or attics where temperature and humidity fluctuate dramatically. Acid-free portfolio boxes provide excellent protection from light, dust, and physical damage. Following these guidelines ensures your minimalist landscape art collection remains an enduring source of beauty and tranquility.
Minimalist landscape art prints offer a timeless approach to home decoration that emphasizes quality over quantity and intention over excess. By understanding the defining characteristics, composition principles, and practical considerations covered in this guide, you’re well-equipped to select and display these pieces effectively. Whether you’re drawn to cool monochromatic seascapes or warm abstract mountains, the right minimalist landscape prints will transform your space into a sanctuary of calm sophistication that reflects your personal aesthetic while honoring the fundamental principles of simplicity and balance.
joerussell
Australian abstract artists based in Byron Bay and curator of the GumPrints art print collection.
Transforming a blank wall into a captivating gallery space can seem daunting, especially when you’re unsure of how to achieve professional results. Understanding the proper techniques for hanging art prints makes the difference between a cluttered, unbalanced display and a sophisticated focal point that elevates your entire room. Whether you’re showcasing landscape art or abstract pieces, mastering the fundamentals ensures your artwork looks intentional and polished.
Professional art hanging relies on three core principles: proper height placement, correct spacing, and secure mounting techniques. The standard rule places artwork at eye level, approximately 57-60 inches from the floor to the center of the print. For gallery walls or multiple pieces, maintain consistent spacing of 2-3 inches between frames. Always use appropriate hanging hardware based on your wall type and artwork weight, ensuring secure installation that protects both your walls and valuable prints.
Essential Tools and Materials for Hanging Art
Before beginning your installation, assembling the right tools ensures a smooth process. The quality of your materials directly impacts both the ease of installation and the longevity of your display. Professional results require more than just a hammer and nail.
Every art hanging kit should include these fundamental items:
Measuring tape and pencil for precise marking
Laser level or traditional bubble level for alignment
Appropriate wall anchors and picture hooks
Hammer and/or screwdriver depending on hardware
Stud finder for locating wall support beams
Painter’s tape for marking positions without damage
Additionally, consider investing in specialty items like a picture hanging tool with built-in levels. These combination tools streamline the process significantly. Furthermore, keep felt bumpers on hand to protect walls from frame corners and prevent artwork from shifting over time.
Selecting the Right Hardware
Hardware selection depends on three factors: wall material, artwork weight, and frame type. Drywall requires different anchors than plaster or brick walls. Moreover, a lightweight print needs only a simple nail, while heavier framed pieces demand substantial support.
For prints under 10 pounds, standard picture hooks work well. However, artwork weighing 10-25 pounds requires toggle bolts or anchors. Consequently, anything heavier should ideally mount to wall studs using wood screws for maximum security.
Measuring and Planning Your Placement
Thoughtful planning prevents unnecessary wall damage and ensures optimal visual impact. Professional installers always measure twice and mark carefully before making any holes. This methodical approach saves time and frustration while delivering superior results.
The standard eye-level placement sits at 57-60 inches from the floor to the artwork’s center. This measurement aligns with museum and gallery standards, creating comfortable viewing angles. Nevertheless, adjust slightly based on ceiling height and furniture placement in the room.
The Mathematical Approach to Centering
Calculating exact placement requires simple mathematics. First, measure your artwork height and divide by two. Then, measure the distance from the frame’s top edge to the hanging hardware. Subtract this hardware measurement from the half-height number. Finally, add this result to 57 inches to find your wall marking point.
For example, a 24-inch tall print with hardware 2 inches below the top edge requires marking at 67 inches (12 + 57, minus the 2-inch hardware offset). Therefore, your nail or hook goes at precisely 67 inches from the floor. This calculation method works for any artwork size, as discussed in our guide to displaying art prints beautifully.
Planning Around Furniture and Architectural Features
Artwork positioned above furniture follows different guidelines. Generally, leave 6-8 inches between the furniture top and the frame’s bottom edge. This spacing creates visual connection while maintaining distinct separation between elements.
Additionally, consider architectural features like windows, doorways, and built-ins. Artwork should relate proportionally to these elements. Moreover, ensure adequate breathing room on all sides, preventing cramped or cluttered appearances that diminish visual impact.
Wall-Specific Hanging Techniques
Different wall materials demand specialized approaches for secure mounting. Understanding your wall composition prevents damage and ensures artwork stays safely in place. The wrong hardware on the wrong surface leads to frustrating failures and potential damage to both walls and artwork.
Standard drywall covers most modern homes, offering relatively straightforward installation. However, older homes may feature plaster, while apartments might have concrete or brick. Each material requires specific consideration and appropriate mounting solutions.
Drywall Installation Methods
Drywall provides the simplest installation surface when using appropriate hardware. For lightweight prints, angled picture hooks hammer directly into the drywall. The angled design distributes weight effectively across the wall surface, preventing pull-through failures.
Heavier pieces require anchors that expand behind the drywall. Plastic anchors work for medium weights, while toggle bolts provide maximum holding power. Nevertheless, the strongest option always involves locating studs with a stud finder and screwing directly into these wooden support beams.
Working with Plaster Walls
Plaster walls demand extra caution due to their brittle nature. Pre-drilling small pilot holes prevents cracking and crumbling. Use masonry bits at low speed, advancing slowly to minimize vibration damage. Furthermore, specialized plaster hooks distribute weight across larger surface areas than standard nails.
According to This Old House experts, traditional picture rail molding offers an excellent alternative for historic homes. These systems eliminate the need for wall penetrations entirely while providing flexible hanging options.
Masonry and Concrete Solutions
Brick and concrete require specialized masonry anchors and appropriate drilling equipment. A hammer drill with masonry bits creates clean holes without excessive wall damage. Insert plastic or metal masonry anchors, then secure screws into these anchors for solid holding power.
Alternatively, adhesive strips designed for heavy-duty applications eliminate drilling entirely. These products work well for renters or those hesitant about permanent wall modifications. However, always check weight limits and follow manufacturer instructions precisely for reliable results.
Hanging a Single Large Artwork
Step 1: Prepare Your Workspace and Tools
Clear the wall area and gather all necessary tools. Place a drop cloth below to protect flooring from debris. Have your measuring tape, level, pencil, and appropriate hardware within easy reach. Additionally, enlist a helper for larger, heavier pieces to prevent accidents and enable easier positioning.
Step 2: Mark Your Center Point
Measure the wall width and mark the center point lightly with pencil. Then, measure 57-60 inches from the floor and mark this height at your center point. This intersection becomes your artwork’s center reference, similar to techniques used when considering large wall art ideas for home decor.
Step 3: Calculate Hardware Placement
Measure your artwork dimensions and the distance from the top edge to the hanging hardware. Use the mathematical formula provided earlier to determine where your wall hook should sit. Mark this point clearly, then use your level to ensure perfect horizontal alignment.
Step 4: Install the Hanging Hardware
Install your chosen hardware at the marked location, ensuring it’s appropriate for your wall type and artwork weight. For drywall, angle picture hooks in an upward direction for maximum holding strength. Consequently, test the hardware before hanging your artwork by gently pulling downward to confirm secure attachment.
Step 5: Hang and Level Your Artwork
Carefully lift your artwork onto the installed hardware. Use your level across the frame’s top edge to check horizontal alignment. Make minor adjustments as needed, then step back to assess the overall positioning. Moreover, attach felt bumpers to the bottom corners to protect your wall and maintain level positioning over time.
Creating Gallery Wall Arrangements
Gallery walls transform multiple smaller prints into cohesive artistic statements. However, achieving professional results requires careful planning and consistent spacing. The complexity increases with each additional piece, making templates and mockups essential for success.
Start by creating paper templates matching your frame sizes. Use painter’s tape to arrange these templates on the wall, experimenting with different configurations. This non-destructive approach lets you visualize the final result before making any permanent holes. Furthermore, photograph different arrangements to compare options easily.
Spacing and Arrangement Principles
Maintain consistent spacing between all frames, typically 2-3 inches throughout the arrangement. This uniform spacing creates visual cohesion across diverse frame sizes and artwork styles. Nevertheless, some designers prefer slightly wider spacing of 3-4 inches for more breathing room, especially when showcasing pieces from quality landscape art print collections.
Consider the overall shape of your gallery wall arrangement. Grid layouts offer formal symmetry, while organic salon-style arrangements feel more casual and eclectic. Additionally, establish a common alignment element, such as keeping all bottom edges aligned or centering around a horizontal or vertical axis.
Installation Sequence for Gallery Walls
Always start with the central or largest piece as your anchor point. Install this first using the single-artwork technique described earlier. Then, work outward systematically, maintaining your predetermined spacing. Use your level constantly to ensure each piece hangs straight relative to others.
Professional installers often use a laser level projected horizontally across the wall. This provides a constant reference line for alignment throughout the installation process. Consequently, all artwork maintains perfect horizontal relationship regardless of individual frame quirks or wall irregularities. Browse through our print collection to find pieces that work beautifully together in gallery arrangements.
Common Mistakes to Avoid
Even experienced decorators occasionally make preventable errors that compromise their results. Recognizing these common pitfalls helps you achieve professional outcomes on your first attempt. Small mistakes create frustration, while major errors damage walls or artwork permanently.
Hanging artwork too high ranks as the most frequent mistake. Many people instinctively place art higher than optimal, creating uncomfortable viewing angles. Remember the 57-60 inch center height guideline applies in most situations. However, adjust slightly for rooms where people primarily sit, lowering artwork a few inches for better sightlines.
Hardware and Weight Issues
Using inadequate hardware for artwork weight causes both immediate and long-term problems. A small nail might hold initially but fails over time as wall material degrades around it. Always err on the side of overbuilding your support system, especially for valuable or irreplaceable pieces.
Additionally, neglecting to account for glass weight leads to failures. Framed prints with glass weigh significantly more than the paper alone. Therefore, factor in the complete weight including frame, matting, glass, and backing when selecting hardware and anchors.
Ignoring Environmental Factors
Placing artwork in direct sunlight causes fading and damage over time. Similarly, hanging prints near heating vents or in humid bathrooms accelerates deterioration. Consider environmental conditions when selecting locations, prioritizing preservation alongside aesthetic concerns, particularly with pieces highlighting elements of great landscape art.
Furthermore, avoid hanging valuable artwork on exterior walls in climates with extreme temperature fluctuations. These walls experience greater temperature and humidity variations that stress paper and canvas. Interior walls provide more stable conditions for long-term preservation.
Maintenance and Long-Term Care
Properly hung artwork still requires periodic attention to maintain optimal appearance and security. Regular inspection catches problems early before they escalate into damage or safety hazards. Moreover, simple maintenance extends the life of both your artwork and wall surfaces.
Check hanging hardware every six months, especially for heavier pieces. Gently test for any looseness or degradation in the mounting system. Tighten loose screws immediately and replace any hardware showing signs of stress or corrosion. Additionally, verify that artwork remains level, adjusting as needed.
Cleaning and Dusting Best Practices
Dust accumulates on frames and glass surfaces, diminishing visual impact over time. Use a soft, dry microfiber cloth for regular dusting, working gently to avoid scratching glass or damaging frames. For glass cleaning, spray cleaner on the cloth rather than directly on the glass to prevent liquid seeping behind the glazing.
Never clean the artwork itself without professional guidance. Paper prints are particularly vulnerable to damage from moisture and cleaning products. Therefore, if the print requires cleaning, consult a professional art conservator rather than attempting DIY solutions.
Adjusting and Repositioning
Artwork naturally shifts slightly over time due to vibrations, temperature changes, and settling. Check alignment periodically using your level, making minor adjustments as needed. Keep those felt bumpers fresh, replacing them when adhesion weakens to maintain protection and positioning.
When relocating artwork to different walls, patch previous holes properly before painting. Use spackling compound for small nail holes, sanding smooth when dry. This attention to detail maintains wall condition and provides a fresh canvas for your next arrangement, especially when matching art decor for every room.
Seasonal Considerations
Seasonal humidity changes affect both artwork and hanging hardware. During humid months, paper expands slightly and hardware may loosen as walls absorb moisture. Conversely, dry winter air causes contraction. Monitor your installation more closely during seasonal transitions, making adjustments as necessary.
Consider using a room humidifier or dehumidifier to maintain stable conditions year-round. Optimal relative humidity for artwork preservation ranges between 40-50%. This stability protects your prints while also benefiting other home furnishings and occupant comfort.
Mastering the art of hanging prints professionally transforms your home into a curated gallery space. By following proper measurement techniques, selecting appropriate hardware, and maintaining your installations regularly, you ensure beautiful, secure displays that enhance your décor for years to come. Remember that practice builds confidence—each piece you hang reinforces these skills and improves your results. Start with these fundamental techniques, and soon you’ll approach every blank wall as an opportunity for creative expression rather than a daunting challenge.
joerussell
Australian abstract artists based in Byron Bay and curator of the GumPrints art print collection.
Decorating your home with stunning statement pieces can transform any room from ordinary to extraordinary. When it comes to making a bold visual impact, large wall art serves as the perfect focal point to anchor your interior design. Whether you’re working with a spacious living room, a minimalist bedroom, or an open-plan dining area, understanding how to select and display oversized artwork is essential for creating a cohesive, sophisticated look.
For beginners entering the world of home decor, large wall art offers an accessible way to express personal style while filling empty spaces with purpose and personality. This guide presents 25 practical ideas specifically designed to help you navigate the world of oversized art, from understanding proper sizing and placement to exploring various styles that complement your existing decor. By the end, you’ll have the confidence to transform your blank walls into captivating visual displays that reflect your unique aesthetic.
Understanding Scale and Proportion
Before selecting any oversized artwork, it’s crucial to understand the relationship between wall dimensions and art size. As a general rule, your artwork should occupy approximately 60-75% of the available wall space to create visual balance. Moreover, pieces measuring 30 inches or larger in any direction typically qualify as large wall art and require careful consideration of viewing distance.
To determine the ideal size, measure your wall’s width and multiply by 0.65 to find the optimal art width. This calculation ensures your piece commands attention without overwhelming the space. Additionally, consider ceiling height—taller rooms can accommodate vertically-oriented pieces that draw the eye upward, creating an illusion of even greater space.
Measuring Your Wall Space
Start by clearing furniture away from the wall you plan to decorate. Use painter’s tape to outline potential art dimensions directly on the wall, which allows you to visualize the final placement. Furthermore, photograph the taped outline from various angles and distances where you’ll typically view the artwork. This simple exercise prevents costly sizing mistakes and helps you confidently select pieces that enhance rather than dominate your space.
Landscape-Inspired Large Wall Art
Nature-inspired artwork remains one of the most versatile and timeless choices for home decor. Landscape prints bring the serenity of the outdoors inside, creating calming atmospheres that promote relaxation and well-being. Consequently, these pieces work exceptionally well in living rooms, bedrooms, and home offices where you seek a peaceful ambiance.
Consider panoramic coastline scenes that stretch horizontally across a wall, emphasizing width and creating a window-like effect. Similarly, majestic mountain ranges printed on canvas can establish a dramatic focal point above a sofa or bed. For those interested in exploring various natural themes, landscape art styles for home decor offers comprehensive guidance on matching scenery to your aesthetic preferences.
Forest and Woodland Themes
Woodland scenes featuring towering trees create vertical interest that suits rooms with high ceilings. These compositions naturally guide the eye upward, making spaces feel more expansive. Additionally, forest imagery pairs beautifully with natural materials like wood furniture, jute rugs, and linen textiles, reinforcing a cohesive organic design theme throughout your home.
Coastal and Ocean Vistas
Ocean scenes in large format bring tranquility and a sense of escape to any room. Whether you prefer abstract wave interpretations or photographic beach sunsets, coastal artwork complements both modern and traditional interiors. These pieces work particularly well in bathrooms, bedrooms, and relaxation spaces where a calming atmosphere is paramount.
Strategic Placement for Maximum Impact
Proper placement significantly influences how effectively your large wall art transforms a space. The standard guideline positions artwork so its center sits at eye level, typically 57-60 inches from the floor. However, when hanging art above furniture, maintain 6-12 inches of space between the furniture top and the artwork’s bottom edge to create visual connection without crowding.
In living rooms, position large pieces above sofas to anchor the seating area and establish a clear focal point. Meanwhile, dining rooms benefit from dramatic artwork centered on the main wall, which guests naturally face during meals. For comprehensive display techniques, our guide to displaying art prints beautifully provides room-by-room recommendations.
Creating Gallery Walls
While this guide focuses on single large pieces, combining multiple medium-sized artworks can create the visual impact of one large installation. Arrange three to five pieces in asymmetrical layouts, maintaining consistent spacing of 2-3 inches between frames. This approach offers flexibility and allows you to curate personalized collections that evolve with your taste.
Choosing the Right Style for Your Space
Your art style should harmonize with your existing interior design while adding personality and visual interest. Contemporary spaces pair well with abstract compositions, geometric patterns, or minimalist photography. Conversely, traditional homes benefit from classic landscape paintings, botanical prints, or representational artwork with ornate frames.
According to interior design principles, successful spaces balance various elements including color, texture, and style. Therefore, consider how your large wall art contributes to this balance. A modern abstract piece can energize a neutral room, while a serene landscape softens industrial aesthetics.
Abstract Expressionism
Abstract art in large format creates dynamic focal points that encourage interpretation and conversation. Bold brushstrokes, vibrant color blocks, or subtle tonal variations offer endless possibilities. These pieces work exceptionally well in minimalist spaces where they provide visual complexity without physical clutter.
Photographic Prints
Oversized photography brings gallery-quality sophistication to residential spaces. Black-and-white architectural photography suits modern interiors, while color nature photography adds warmth and vitality. Furthermore, the crisp detail of large-format photography creates stunning visual impact that commands attention from across the room.
Color Coordination and Room Harmony
Selecting artwork colors that complement your existing palette ensures cohesive design flow throughout your home. Identify the dominant colors in your room—typically found in large furniture pieces, area rugs, or wall paint. Subsequently, choose art that incorporates these hues along with one or two accent colors to create visual interest without clash.
For neutral rooms featuring beige, gray, or white, consider artwork with pops of color that introduce energy and personality. Alternatively, if your space already features bold colors, select art in complementary neutral tones to provide visual rest. The landscape art color matching guide offers detailed strategies for creating harmonious color schemes.
Monochromatic Schemes
Single-color artwork creates sophisticated, calming environments perfect for bedrooms and meditation spaces. Monochromatic pieces in shades of blue promote tranquility, while earth tones establish grounding, organic atmospheres. These selections allow texture and composition to take center stage without color competition.
Practical Installation Tips
Installing large wall art requires proper preparation to ensure both safety and aesthetic success. First, locate wall studs using a stud finder, as large pieces need secure anchoring points. Use appropriate hanging hardware rated for your artwork’s weight—typically D-rings with picture wire for pieces under 50 pounds, or French cleats for heavier installations.
Always enlist help when hanging large artwork, as two people ensure level placement and prevent damage to both walls and art. Mark your desired placement with pencil before drilling, and double-check measurements from multiple points. If you’re exploring options before installation, browse various styles in our art print collection to find pieces that inspire your design vision.
Lighting Considerations
Proper lighting dramatically enhances large wall art’s visual impact. Install picture lights, track lighting, or recessed spotlights to illuminate your artwork without glare. Position lights at 30-degree angles from the wall to minimize shadows and reflections. Additionally, avoid placing art in direct sunlight, which causes fading over time and damages delicate prints.
Maintenance and Care
Large art prints require minimal maintenance but benefit from regular dusting with soft, dry cloths. Glass-covered pieces should be cleaned with streak-free glass cleaner applied to the cloth rather than directly on the glass. Moreover, monitor humidity levels in your home, as excessive moisture can warp canvases and damage paper prints over time.
Common Mistakes to Avoid
Even enthusiastic decorators make predictable errors when selecting and displaying large wall art. The most frequent mistake involves choosing pieces that are too small for the designated wall space, creating a disconnected, floating appearance. Remember that going slightly larger than anticipated typically yields better visual results than undersized selections.
Another common error involves ignoring the room’s existing style and color palette, resulting in artwork that feels out of place. Additionally, hanging art too high—a surprisingly widespread issue—forces viewers to strain their necks and diminishes the piece’s impact. For room-specific guidance, consult our resource on matching art decor for every room.
Budget Considerations
Large wall art represents an investment, but numerous affordable options exist for budget-conscious decorators. High-quality prints offer gallery aesthetics at accessible price points compared to original paintings. Furthermore, choosing unframed prints allows you to control framing costs by sourcing frames separately or displaying prints on mounted canvas.
When making purchasing decisions, prioritize quality over quantity. One stunning large piece creates more impact than multiple mediocre smaller works. Research artists and print retailers carefully, reading reviews and examining return policies. The guide on essential tips for buying art prints helps you make informed decisions that maximize value.
Personal Style Evolution
Your aesthetic preferences naturally evolve over time, so consider this when investing in large wall art. Select timeless pieces that transcend fleeting trends, or choose affordable options that allow for periodic updates. Seasonal rotations keep your decor fresh—swap coastal summer scenes for cozy autumn landscapes to reflect changing moods and seasons.
Ultimately, the best large wall art reflects your personal journey and creates emotional connections. Whether you’re drawn to serene landscapes, vibrant abstracts, or striking photography, choose pieces that resonate with your experiences and aspirations. Your walls tell your story, so curate them thoughtfully with artwork that brings joy each time you enter the room.
As you embark on your decorating journey, remember that selecting large wall art is both an art and a science. By understanding proportions, considering your existing decor, and thoughtfully planning placement, you’ll transform empty walls into captivating focal points. The 25 ideas explored throughout this guide provide a foundation for developing your unique aesthetic vision, whether you prefer nature-inspired landscapes, contemporary abstracts, or classic photographic prints.
Take your time exploring options, measure carefully, and don’t hesitate to experiment with placement before committing to permanent installation. The investment you make in quality large wall art pays dividends through enhanced ambiance, increased home value, and the daily pleasure of living surrounded by beauty. For additional inspiration and practical advice, explore our comprehensive art print tips to continue refining your decorating skills and creating spaces you’ll love for years to come.
joerussell
Australian abstract artists based in Byron Bay and curator of the GumPrints art print collection.